How to Paint Your Front Door

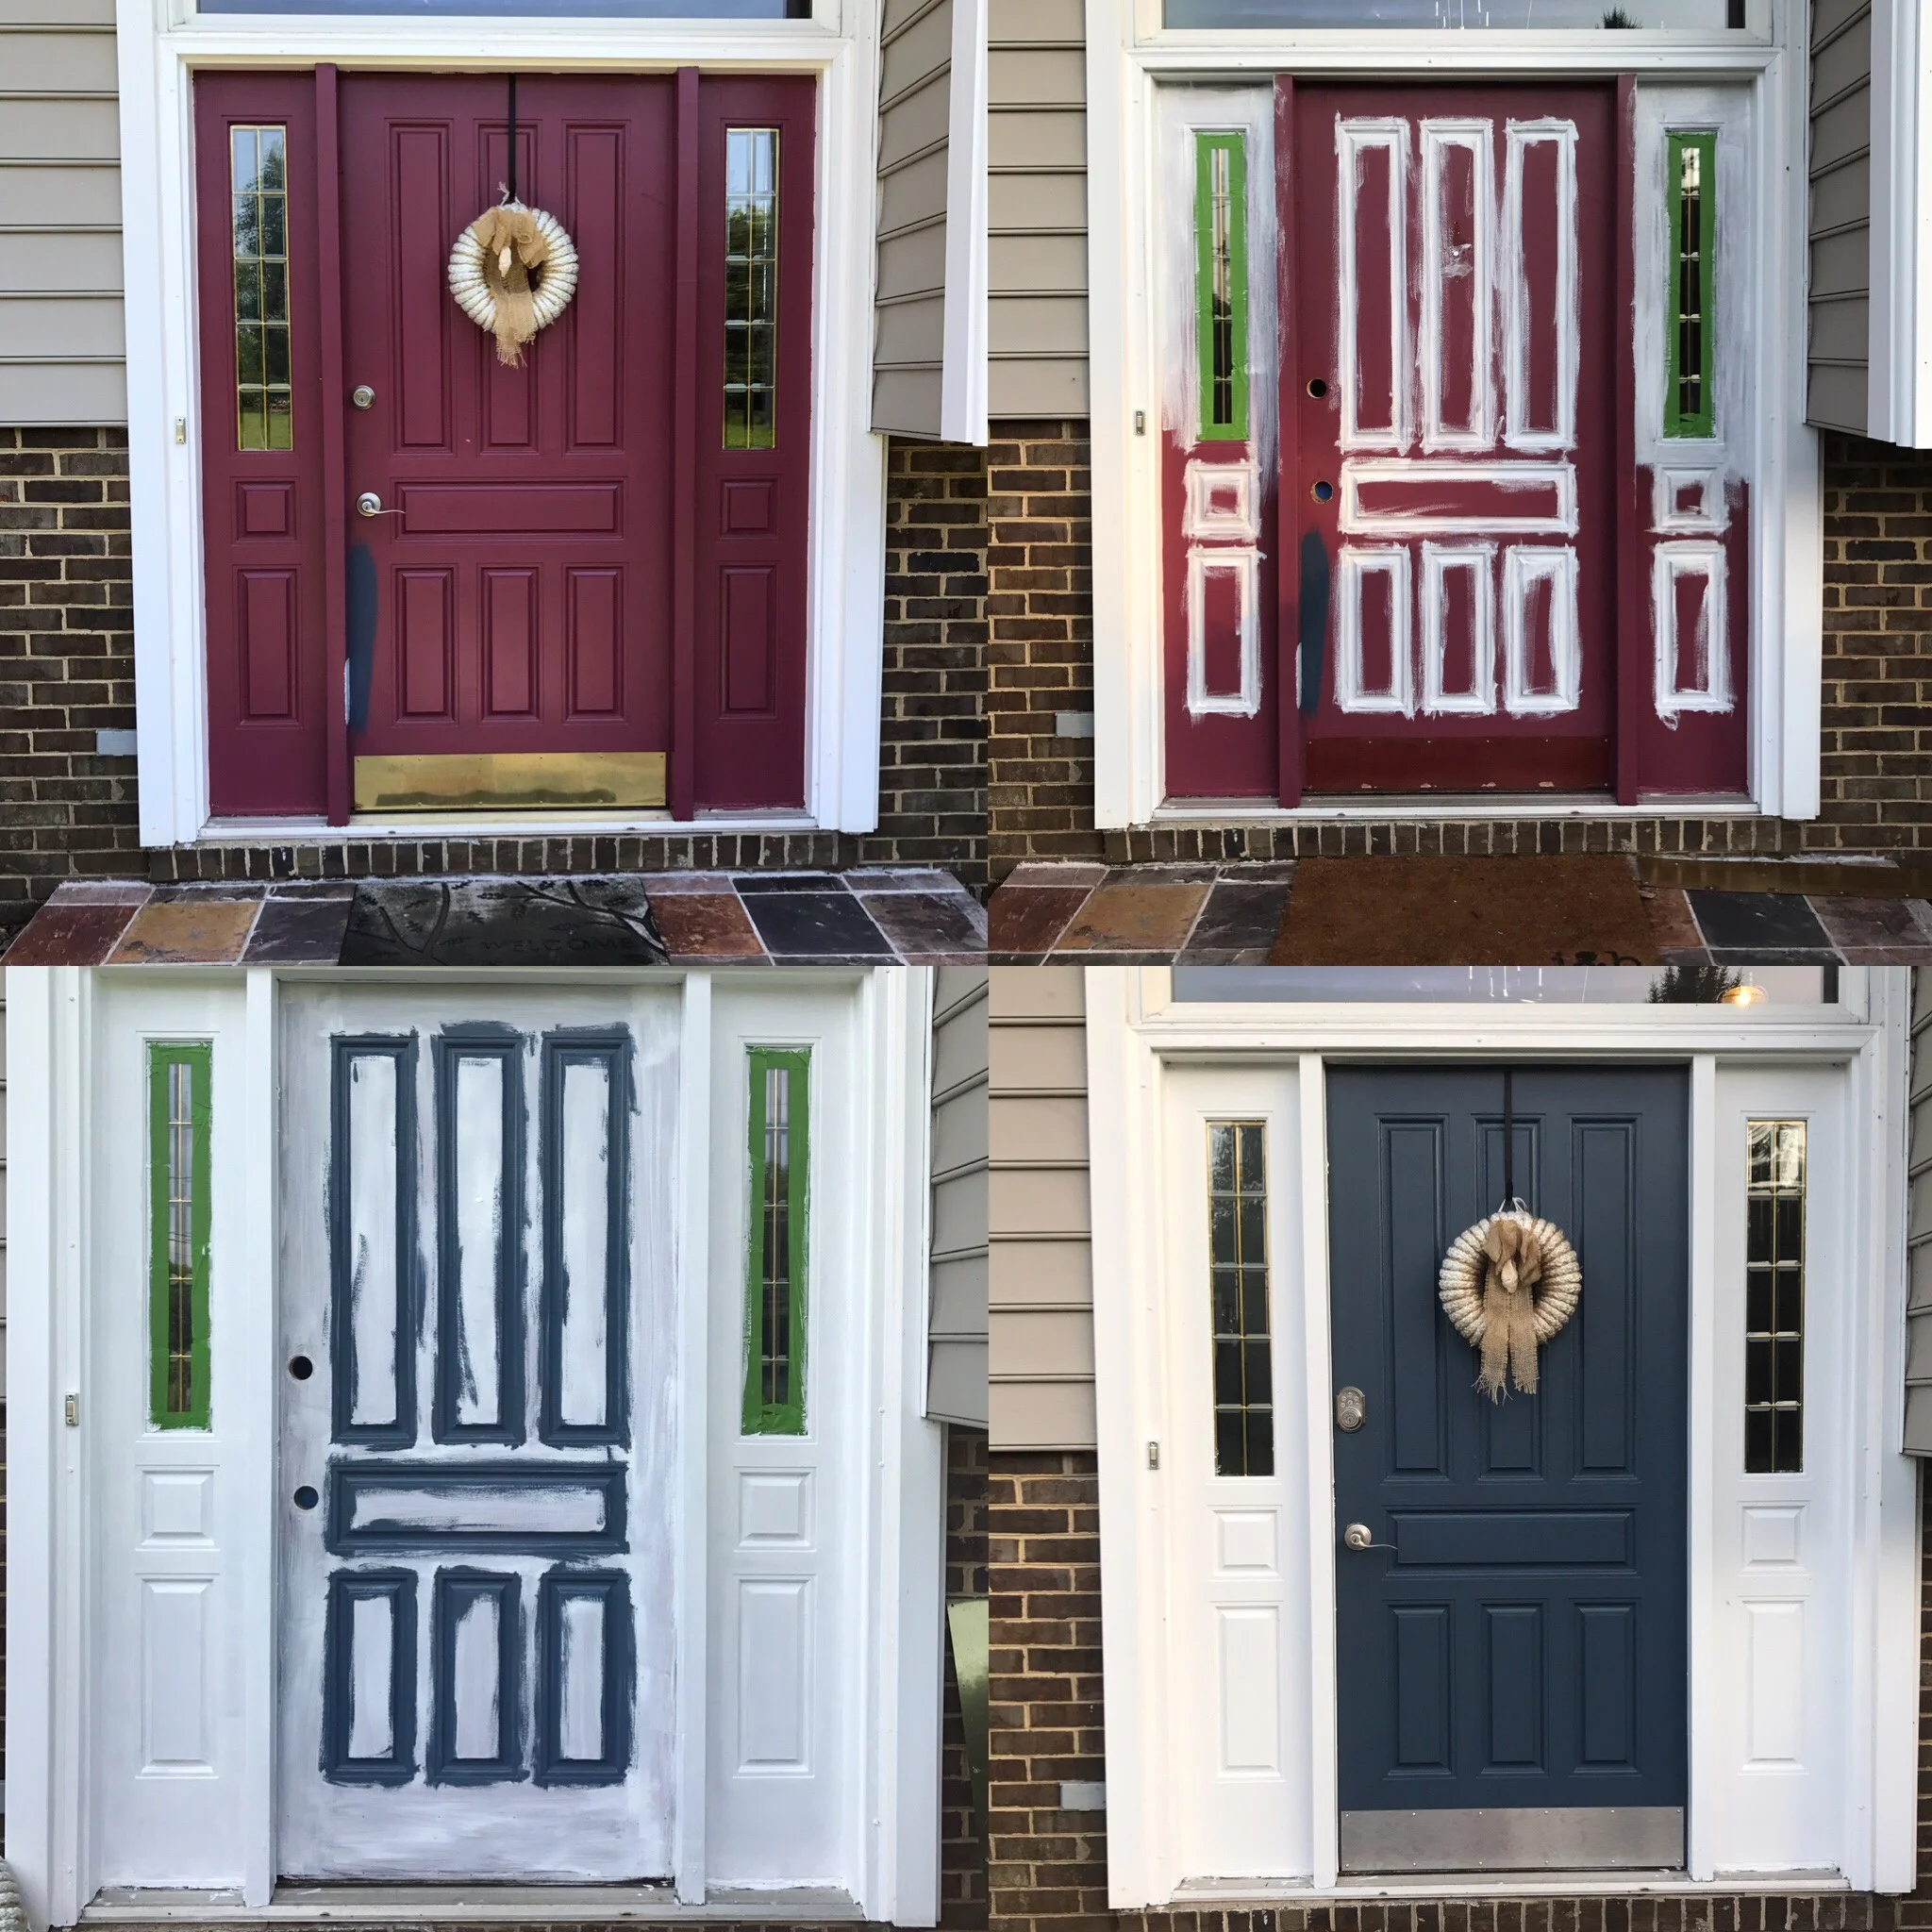
When we first went to look at the new house the very first impression was walking through this terribly dated purple front door.  I remember thinking to myself, "well if we like this house that will be the first to go."  And that is was!  Below you will find step by step instructions on how to paint your front door without taking it off the hinges.  I would recommend saving this activity for a day when the chance of rain is 0% and you have the full day to complete all the painting in one swoop!

Step 1:  Supplies Needed

  • Painters tape

  • Zinsser Primer (link here)

  • Screwdriver to remove hardware

  • Sanding sponge

  • Paint brush

  • Foam roller

  • Paint tray

  • Benjamin Moore Paint

Step 2: Remove all Hardware

Use the screwdriver to remove all hardware.  If you are going to use the same hardware pay extra attention when you are taking it off so you know how to re-assemble the pieces once the door is painted.  If you need help, youtube was a big life-saver for me.

Step 3: Sand the Door

Using a sanding sponge, lightly sand the entire door, including the side lights if you have them.  My door was previously painted with an oil based paint so this step was a little tough. The paint didn't create dust like typical sanding, it more just roughed up the surface.  This is where step 5 really comes in handy :) 

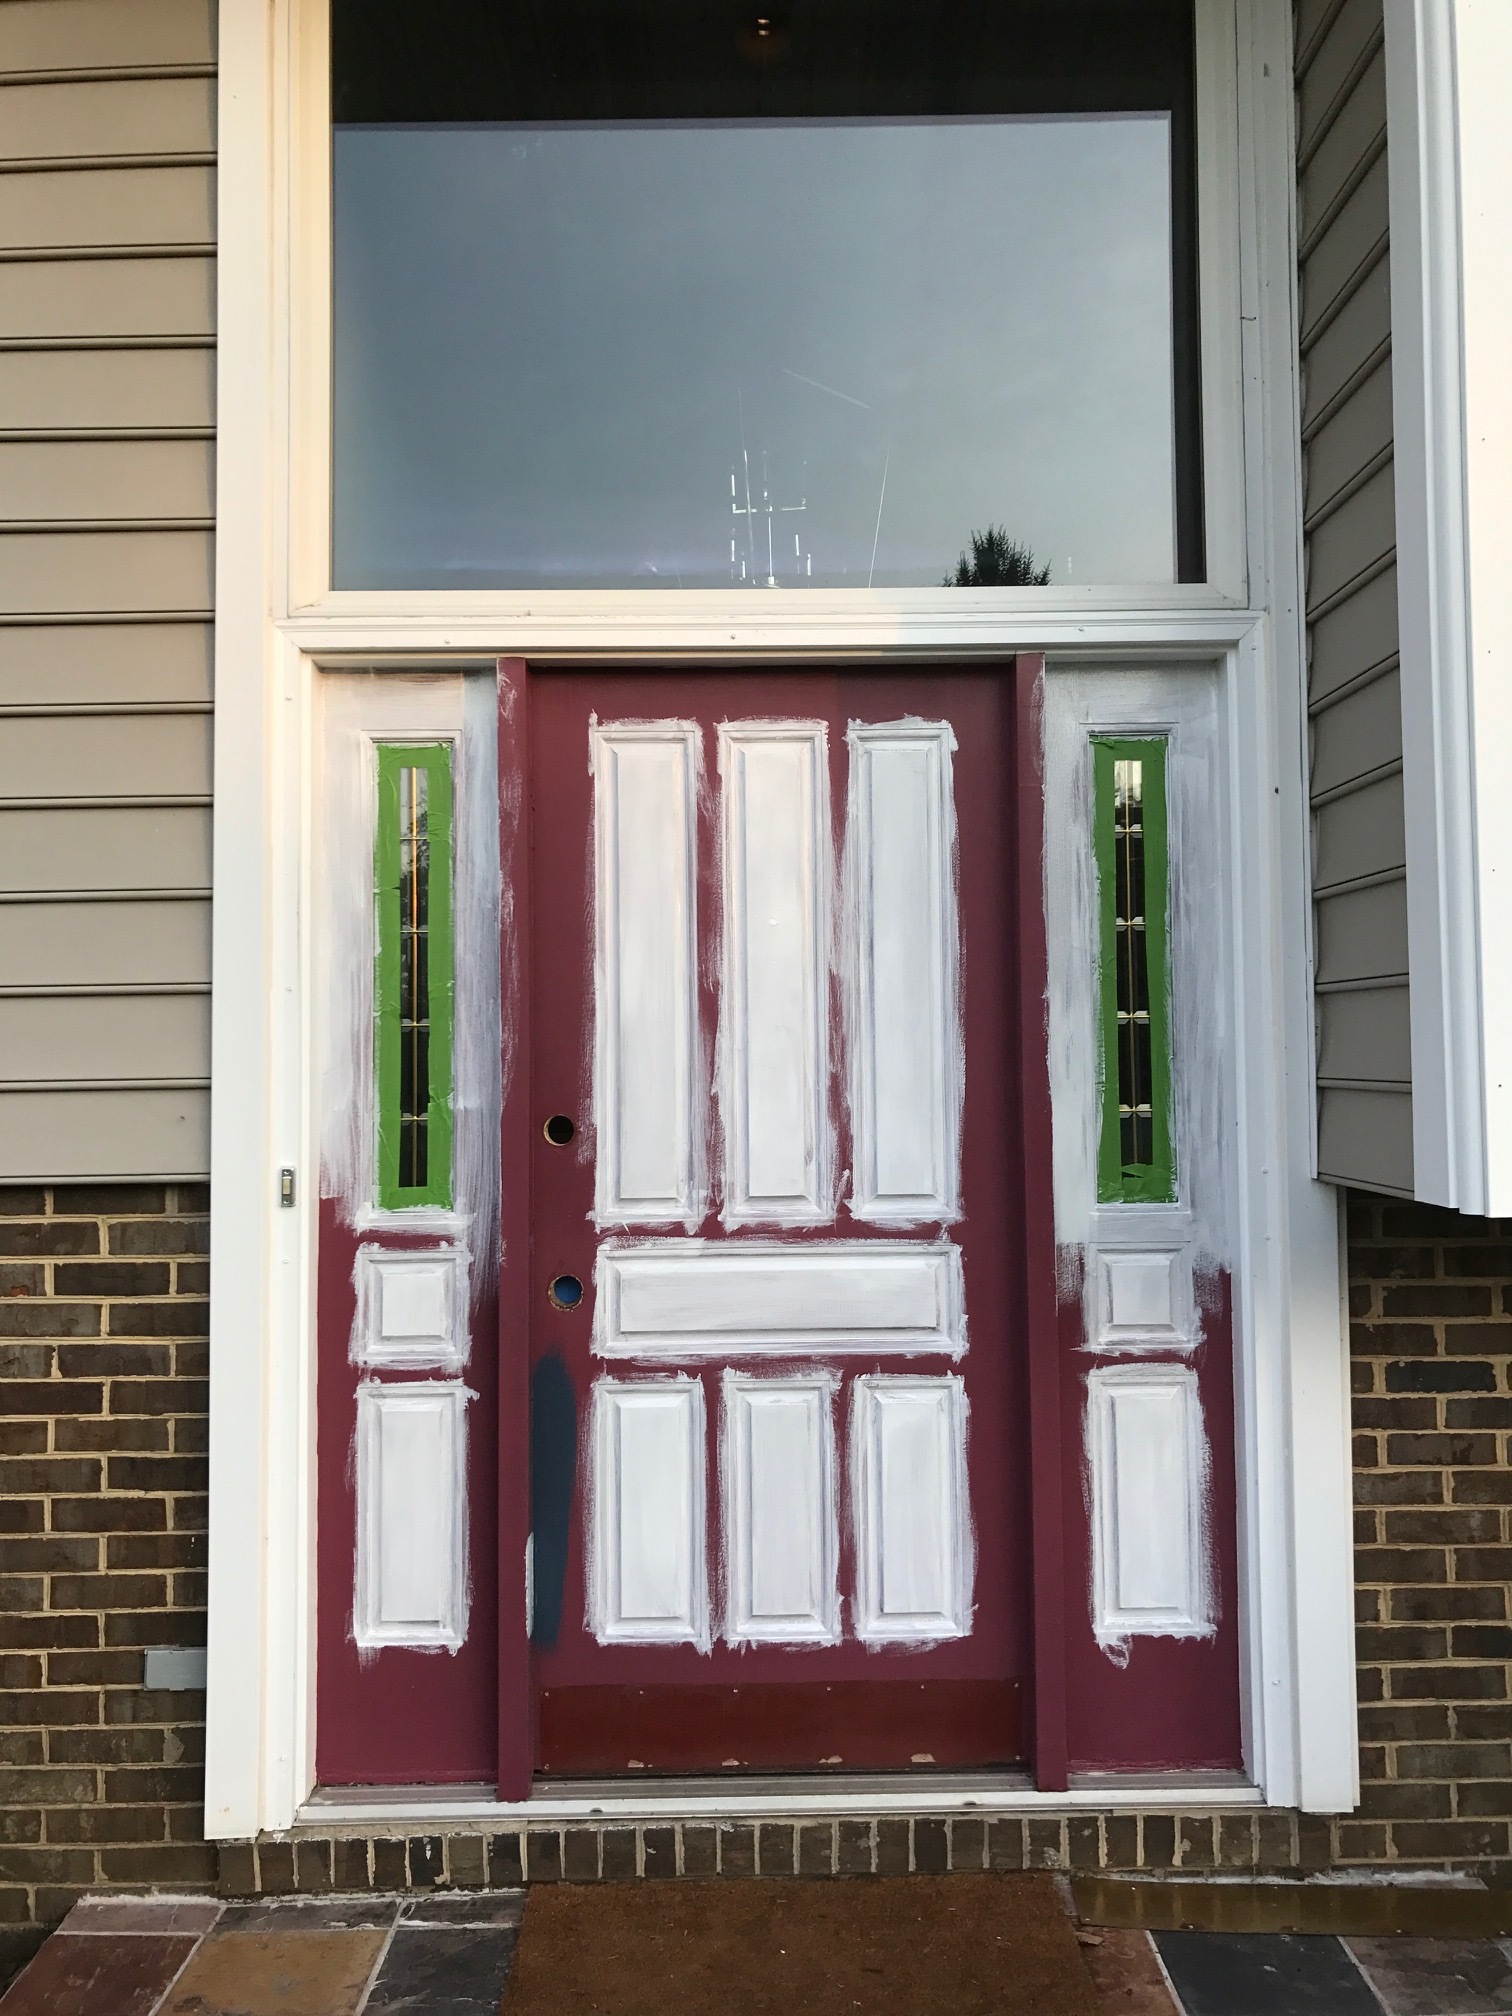
Step 4:  Painters Tape

Our side lights had small windows that I didn't want to have to carefully edge around so I applied painters tape to the glass.  The other surrounding areas were already white so I didn't bother with the sides of the doors, or the top and bottom. 

Step 5:  Apply the Primer

The primer is the most critical step for a long lasting product.  This will help the old color of your door not seep through your new color and also help your new paint adhere without future pealing.  Apply the primer in the steps outlined below. Allow the primer at least 1 full hour to dry but if you buy a different brand, follow their drying instructions. 

Step 6: 1st Coat of Paint!

Using your paint, follow the same path as you did with the primer.  Allow the paint to fully dry before moving onto step 7. 

Step 7: 2nd Coat of Paint

My door only needed two coats of paint.  Probably because I spent a little extra money on the Benjamin Moore paint. Allow the 2nd coat of paint to fully dry before moving onto the next step. 

Step 8:  Remove the Painters Tape and Reinstall the Hardware

Now that the door is fully dry you can remove the painters tape.  I used a razor blade to cut the tape away from the paint so I didn't pull any of the new paint off the door.  This creates a nice smooth, clean line for a quality finished product.  If any paint remains on the glass you can use the razor blade to carefully scrape it off.

Finally, you can re-install all your hardware.  This is another reason I suggest waiting until you have a full day to dedicate to this project.  If you don't want to leave your front door unlocked or have to re-install the hardware multiple times throughout the project this is defiantly the easiest way.  I traded the old brass kick plate for a new brushed nickel option to match the hardware.  We also decided to install a keypad deadbolt which we are huge fans off!  

Step 9:  Decorate

I plan to add some planters next spring but for now, Junie B's wreath was the perfect finishing touch! Want your own wreath?  Send me an email and I’ll hook you up! <3.

IMG_1055.JPG


Spread the Love & Dream Big!

Mrs. Madej


Traditionally Coastal - A New Hobby

Image-1.jpg

As social media grows around us and I see so many people jumping on the opportunity to make a brand for themselves through social channels, I couldn’t help but be envious and want that for myself. A platform to share ideas, design, and personal DIY projects with a group of people who share the same vibe as me. If you have been following along you could probably infer that our style is coastal with a modern and traditional flare, hence our new Instagram account Traditionally Coastal!

I work in the commercial construction industry managing large projects. Some are fancy with flare like The Watergate Hotel and some are, lets just say…. less visually interesting, such as structural repairs. As much as l love my full time career, my job, my company, and my clients, as I stare out of my work office window looking at a giant concrete structure I can’t help but dream in color, of smelling fresh hydrangeas, and walking along the beaches of Cape Cod. When I get to use my designer spirit at work I feel tamed and complete but when I’m on a project with less design focused work I feel the interior designer beast inside wanting to break free! So… who said you can’t have a little side hobby for yourself?!

As my friends and I get older and start investing in homes I hope I can help them with reno projects, design advice, and share my design journey through Traditionally Coastal with the overall goal to start building my design brand. I have so much bottled up inside and I need ways to get information, ideas, and visions out to all my favorite people. I’m hoping this Instagram account will help and we feel it paired well with the Meet the Madej’s vibe!

For right now we live in a split foyer home in Annapolis, MD. When we started to look for homes the only thought I really had in my head was, “anything but a split level”. But the location was to perfect to care. I have spent the last year changing as much as I can aesthetically about this home to make it feel less like a 1970’s split and more like a modern beach cottage. Traditionally Coastal will highlight some of the ways I have already done this and continue to do so! I also hope to feature some of my favorite coastal design inspirations, deals and steals I find along the way, tips and tricks, and beautiful pictures that make your coastal heart happy!

IMG_6297.jpg

I would love for you to follow along this new journey with me! Want a taste of whats to come - head over to the Traditionally Coastal tab on Meet the Madejs!

Spread the Love & Dream Big!

Mrs. Madej

And WE'RE BACK! Let’s Get Updated!

Hey Friends!!! Long time no blog you say? We’ll things have been a little busy over at the Madej’s. Here is quick update on where we are, what we’re up to and what’s next!

Almost a year ago we added the most beautiful, fun spirited Mini Madej to our family, Emerson Ray Madej. Her birthday is June 10, 2018 and this had been the most amazing year with her. She is happy all the time. Her smile is infectious and we are obsessed. Watching her grow up is a joy! Her favorite toy is a remote. Yes, you read that correctly. Not a play toy remote, any real remote but especially the small apple TV remote that goes missing on the daily. Her favorite food is crab. I swear she will be the three year old that refuses to order off the kids menu and asks for the crab cake dinner instead. She can walk but chooses not too for the time being. I personally feel like she has the brain of a little engineer. She realizes crawling is far more efficient. She also really loves to figure out how and why things work the way they do. I like to say she is determined. She gets that from Mr. Madej. She is a sleeping queen! 7pm-7am daily! We had to suffer through the the few common sleep regressions but our nightly routine of bath, bottle, book bed has worked wonders! Plus the baby hatch sound machine. Go buy this if you don’t have it already :) More on Emerson in future posts but thought our blog followers deserved a small update for now!

Our lives are crazy hectic with Mr. Madej working full time and pursuing his Masters in Data Science from Northwestern University. The degree is 12 courses. As of June 10th we are 8 classes down and have 4 to go! We are hoping to have a degree in hand by the end of 2019! I say “we” because this is a total team effort. We are so proud of him for balancing work, our family and school all at the same time and keeping up a 4.0 at such a prestigious school. But let’s be honest…. some Madej’s (cough, cough…me) are VERY excited for graduation!!

I have also made some big career moves the past few months. I’m officially running my largest solo project of $50M+ for a very large DC metro Developer, JBG Smith. What’s the project you might ask? Well….. it’s Amazon’s new East Coast headquarters which will be the new home for over 1,500 employees! It is an absolute honor to be working on such an amazing project for my favorite client and for such an awesome and news worthy tenant. The site location is National Landing, the old Crystal City, VA south of the Pentagon. My commute is very rough from Annapolis to DC daily, but this project is worth it and hopefully is a great step in the right direction for my construction project management career.

And now what you have all come to find out… where’s the update on all the home project’s we have been teasing on Insta?! We’ll they are coming soon! Some posts have already been drafted and are ready to go! We can’t wait to get everyone up to speed!

Spread the Love and Dream Big,

The Madejs

DIY Blanket Ladder for Under $25

IMG_1462.JPG
IMG_1436.JPG

I've always wanted a blanket ladder, but anything I could find to buy had 12" wide steps. I wanted a ladder with wider steps, so the blankets didn't bunch up.  So off to Home Depot I went to get the materials to make my own. I was in and out in less than 10 minutes with everything I needed.  

Materials List  

  • (2) - 2"x2"x6'L pieces of wood  
  • (1) - 2"x1"x6'L piece of wood
  • Have the nice worker at Home Depot cut the 2"X1" into 4 equal lengths of 18".  
  • (16) tack nails  
  • Hammer
  • Ruler or tape measure  
  • Optional: paint  

Directions  

  1. If you want to paint your ladder, paint all your wood pieces first on all sides.  
  2. After the paint is dry lay the two long legs on the floor and mark out where your steps will be.  
  3. I started my bottom step 19" off the floor so if I needed to use it for a blanket, it wouldn't be hanging on the floor.  
  4. Hammer in the bottom step using two tack nails on each side. 
  5. Continue to tack in the other steps separating them by 13".  
  6. Lean against the wall at an angle. 
  7. Hang your blankets!  
13" gap between each step. 

13" gap between each step. 

19" to the bottom of the first step.  

19" to the bottom of the first step.  

IMG_1440.JPG

See below for our blanket ladder placement  in the living room. When picking out your blankets try to mix textures and colors. Marshalls and TJmaxx always have great deals on throw blankets. We got our pottery barn "M" blanket from a friend as a wedding gift. 

IMG_1751.JPG

Please contact with questions!  


Spread the Love & Dream Big, 

Mrs. Madej  

Cajun Shrimp over Cauliflower Mashers

IMG_1650.JPG

Everyone loves a healthy alternative to a classic feel good dish and this concoction is amazing! Josh and I try to make it at least a few times a month. It's very low bugdet, extremely flavorful and it really fills you up. The only negative is we never have any left overs!! The entire dish usually takes under 30 minutes to prepare. 

Ingredients: (Serves 2-3 healthy portions)

  • Cajun Shrimp
    • Large, pealed shrimp (1 lb.)
    • 1/4 tsp - Salt
    • 1/2 tsp - Pepper
    • 1/4 tsp - Paprika
    • 1/4 tsp - Cajun Seasoning
    • 1/4 tsp - Garlic Powder or Fresh Garlic
    • Dash - Old Bay
  • Cauliflower Mashers
    • 1 Head of Cauliflower
    • 1/4 cup - Milk
    • 1 tbsp. - Butter
    • Spoonful - Sour Cream
    • 1 tsp - Garlic or Garlic Powder 

Directions:

  1. Cut and wash cauliflower and then steam on high heat. *For a faster alternative, use frozen Cauliflower in the steam bags from the frozen food section. 
  2. Peal the shrimp and place them in a small mixing bowl.
  3. Heat your pan to medium heat (about a 6/10)
  4. Season the shrimp with the ingredients listed above. For more heat add additional paprika and Cajun seasoning.  For less heat you can reduce the quantity and just add a dash.   
  5. Heat EVOO in the pan with some fresh garlic.
  6. Once the EVOO is fully coated add your shrimp and cook for about 7 minutes gradually stirring.
  7. Test your cauliflower, is it breaking apart? Can you push a fork through it effortlessly?  If so, then it's done and ready to be strained. If not, let it steam for another few minutes.
  8. Place the strained cauliflower in a mixing bowl and add the ingredients listed above. Mix thoroughly and then beat with an electric beater or hand mixer. If you don't have these tools a masher or fork will work, but it will require a bit more energy.
  9. Remove the shrimp from heat.
  10. Plate your cauliflower mashers.
  11. Add the shrimp on top.
  12. Enjoy!
Cauliflower about to be steamed!

Cauliflower about to be steamed!

1 LB of pealed shrimp.

1 LB of pealed shrimp.

Ingredients for the Cajun shrimp.

Ingredients for the Cajun shrimp.

Seasoned shrimp.

Seasoned shrimp.

Shrimp cooking.

Shrimp cooking.

Ingredients for the Cauliflower Mashers! 

Ingredients for the Cauliflower Mashers! 

Cauliflower with ingredients added, ready to be mashed.

Cauliflower with ingredients added, ready to be mashed.

Mashing away! 

Mashing away! 

.....mashed! 

.....mashed! 

IMG_1634.JPG
Time to eat!  

Time to eat!  

Spread the Love & Dream Big, 

The Madejs  

Pappardelle - Garlic, Butter & Pesto Sauce

When you marry an Italian and have a brother-in-law that just got back from Italy you step up your Italian cooking game.... Sunday nights are the best for experimenting in the kitchen and trying your best to create new iconic family meals. It's a whole new way to Sunday Funday.  Try this one for your next comfort meal. 

image.jpg

Ingrediants:   (For a serving size of 4)

  • Pappardelle pasta  
  • Salt
  • Pepper  
  • Crushed red pepper (1/4 tsp)  
  • Olive oil (1 tbsp)  
  • Butter (1 stick)
  • Garlic (4 cloves) 
  • Pesto (1/4 cup) 
  • Lemon juice (1 tsp)  
  • Parmesan cheese (1/4 cup)  
  • Fresh basil  (optional)  

Directions:  

  • Melt one stick of butter in a sauce pan on low heat.  
  • Crush the garlic and add to the sauce pan whisking occasionally.  
  • Boil water for your pasta adding a pinch of salt and 2 tbsp of olive oil.  
  • Add the pesto and lemon juice, crushed red pepper and a dash of fresh ground pepper to the sauce mixture and continue to stir occasionally. 
  • Gradually add the Parmesan cheese and continue to stir as it melts.  
  • When the water comes to a boil add the pasta in and cook as desired.  
  • Keep the sauce on low heat and mix in after straining the pasta. 
  • Plate and top with fresh basil.  
  • Enjoy!  
image.jpg
image.jpg

Spred the Love & Dream Big, 

Mrs. Madej  


DIY Edible Arrangement

Need to surprise a friend with a special treat or a centerpiece for your next summer event?  Try this super simple DIY Edible Arrangement!  Unfortunately buying these beauties comes with quite the hefty price tag.  Doing it yourself is simple, fun, and pretty reasonable in comparison.  I got everything I needed for under $50.  I don't even know if you can buy one this large with all that chocolate covered fruit on the actual Edible Arrangement website :)

Things you'll need from a local dollar store:

  • Bucket
  • Long Skewers
  • Short Skewers
  • 3 blocks of Floral Foam
  • Cookie Cutters (optional)  
  • Tin Foil (if you don't already have it)

Groceries:

  • Strawberries
  • Blueberries
  • Grapes
  • Apples
  • Pineapple
  • Bananas
  • Cantaloupe
  • Honeydew Melon
  • Watermelon  
  • Blackberries
  • Kale
  • White Chocolate
  • Milk Chocolate

Directions:

Start with all your chocolate covered options so they have time to chill

  1. Heat two small pans one with milk choclate chips and one with white cholcate
  2. Clean your strawberries and place each one on the top of a skewer. I used a colander flipped upside down on a cutting board and made room in my fridge to slide it in. This way you don't get any flat chocolate spots. Dip the strawberries in the milk chocolate first and then dip a spoon in the white chocolate and drizzle it over while twisting your skewer. Don't be nervous. Thin lines or thick lines.... It all looks awesome and professional :) 
  3. Repeat the process with your apples. If you line them on a cookie sheet make sure to use wax paper.   
  4. Dip anything else in chocolate that you fee like :)  
  5. Put all chocolate dipped fruits in the fridge to chill  

Next - Prep the Other Fruits:  

  1. Cut 1/2 your melon into wedges and then in halve and put on skewers. Use a scoop to make balls with the other half.
  2. Repeat the process with your honeydew melon. 
  3. Cut the pineapple into 1/2 slices and use a cookie cutter or knife to make a fun shape.  
  4. Cut the watermelon into 1/2-1" slices and use a cookie cutter or knife to make a fun shape. You can also use some watermelon for ball shapes if you want more. 
  5. Put 8-10 blueberries on skewers  
  6. Put 5 grapes in the long direction on skewers. 
  7. Put 2 blackberries on each skewer.

Assemble the Melon Skewers:

Take the melon shape and insert the skewer up and at a diagonal aiming for the center.  Push the skewer through the center of the fruit so 1/2" of the skewer is exposed.  Take a ball of another colored melon and stick it on top to cover the pointy part of the skewer!  Now you have a melon flower!

Assemble your Base:

  1. Fit the floral foam into the bucket tightly trying to avoid leaving large gaps.  I put the foam in two layers.
  2. Cover the floral foam with tin foil.

Assemble your Arrangement:

  1. Start with the larger fruits (i.e. all the melon and pineapple).  Use a patterns and go all the way around the base and insert the skewers at an angle.  When you get back to where you started repeat the process in a second layer closer to the middle but insert the skewers less so the fruit gets taller.  Fill as much space as possible using these fruits so you can use everything else for decoration.  *for the fruit on the lower level, you might need to use the short skewers depending on how deep your bucket/vase is.
  2. Wash and clean your kale leaves and stuff the kale into the bottom of the basket between the skewers to hide all of the floating sticks. 
  3. Next take your blueberry and grape skewers and inserts them in a random order filling the gaps.  Make sure not to stick them too far into the floral foam.  They look fun when they stick out farther.
  4. Lastly - take all your chocolate covered fruit out of the fridge and insert it anywhere to finish it off.
  5. Spin your arrangement around to make sure you didn't miss any big gaps.  Play with the skewers to adjust any of the heights that might look off.
  6. Your Done! - Now you can eat it!.... if your not already full from snacking on everything through the process:)
  7. Keep the arrangement refrigerated until serving or if you have left overs.

The Return of a Legend - The Watergate Hotel Reopens!

After 2 years of extremely hard work I'm proud to say THE WATERGATE HOTEL IS OPEN!  So happy to scratch that off my list of 2016 goals.  (insert the champagne bottle poppin' emoji here!)

For those of you who don't know my involvement on this epic project I'll summarize. I initially joined the Euro Capitol team to be a construction assistant project manager to one of my favorite mentors, Tim Wilson. I quickly adapted to become the owner, Rakel Cohen's right hand in helping with the purchasing of all international materials (think: marble, granite, fancy metals from Italy, curved millwork from Austria, guestroom millwork and furniture from Vietman), designing all the fun stuff you see in a hotel (think: robes, tissue boxes, bathroom amenities, bedding), budgeting for all the equipment and supplies required to open a hotel, designing and buying all of the signage, participating in PR and marking initiatives and so much more. The opportunities were endless but most required me to travel to NYC three days a week for over a year and a half. A big shout out to Mr. Madej for being so supportive of the project and my career. He held down the fort and took amazing care of Cruz all those days I was gone. Another big shout out to our BFF and roommate at the time, Jen Meador for hanging out with Josh so much (I know this wasn't easy, he talks A LOT). Additional shootouts to my parents, June and Chris for hosting me so many nights in NJ, spoiling me with home cooked meals and bringing me back and forth from the bus stop.  Traveling was a great experience - an exhausting one but it also allowed me to experience the culture of NYC,  spend time with some great friends and rack up some serious Amtrak rewards points. 

At times this project felt like we were pushing a train up a huge hill but when you have the opportunity to work with the team I did anything is possible.  I was honored to work with so many amazing mentors who were not only responsible for teaching me countless things to apply to my career but also are now lifelong friends. To Rakel - you were a great boss but an even better friend <3.  Thank you Tim, Mary, Nicolas & Mark for always looking past the hard times and participating in things like Thanksgiving, Christmas bar crawls, Nats games, Caps games, wine tours, and best of all French Lunch.  The job wouldn't have been the same without getting to share it with all of you!

I hope any of you who live in DC or who are passing through take some time to stop by the hotel and see the masterpiece that was created. The lobby is truly a work of art. Stop by the Whiskey Bar and taste some of the rarest products the market has to offer, eat in the restaurant, King Bird or hit the roof top (opening in July) for sunset happy hour.  Call us and we can meet you there! 

Lastly - if we ever sat down and had a conversation about this project - thank you! All of your support is what got me through a very exhausting job. I hope this iconic project stands tall for years and years to come because at the end of the day it was extremely rewarding and I am unbelievably proud. 

See the Watergate Hotel in the News! 

  • Bloomberg - http://www.bloomberg.com/news/articles/2016-06-14/the-other-scandals-the-watergate-hotel-wants-you-to-forget
  • NBC - http://www.nbcnews.com/news/us-news/watergate-hotel-redux-nod-scandal-clandestine-kitsch-n589921
  • USA Today - http://www.usatoday.com/story/travel/roadwarriorvoices/2016/06/15/watergate-hotel/85922992/
  • The Washington Post - https://www.washingtonpost.com/news/reliable-source/wp/2016/06/15/the-watergate-hotels-reopening-party-has-a-scandalous-theme-but-an-upstanding-crowd/
  • Vanity Fair - http://www.bloomberg.com/news/articles/2016-06-14/the-other-scandals-the-watergate-hotel-wants-you-to-forget
  • Conde Nast Traveler - http://www.cntraveler.com/stories/2016-06-15/the-legendary-watergate-hotel-reopens-in-washington-dc


So you may ask - what's next? I have recently accepted a project management position with Hanscomb Consulting!  The position allows me to continue to consult back the hotel project for little things left to wrap up while working on other projects at the same time. First up is a lobby renovation at the Watergate West building and a large facade project at the Hilton in Crystal City. 

Spread the Love & Dream Big,

Mrs. Madej

1 Year of Marriage Strong!

image.jpg

Today marks the day 1 year ago when The Madejs exchanged their vows in front of all their family and friends and declared they would love each other forever. I'm happy to report that 365 days later the honeymoon phase has not diminished. We are still more in love than ever and even more.  Each day we look at each other and feel absolutely blessed that no matter what, we have each other.  The greatest teammate you will ever have is your one true love who doubles as your best friend. For those of you who want to re-visit 6/6/15 or who were unable to attend we are lucky enough to have our vows recorded. Enjoy (and try to hold back the tears)!

Check back in the next few days for a blog post all about our recent anniversary vacation to the British Virgin Islands!

Spread the Love & Dream Big,

The Madejs

1 year of Marriage Strong!

Easter Madej Style

Well it was our first married Easter! We were lucky enough to celebrate with one of our favorite Hartmanns, Arianna! Holidays mean making new traditions.  This Easter we broke out the table cloth in the photos below. My parents bought this tablecloth in Gemany in 1989 as a gift to my late Great Aunt Maraget. When I inherited her farm table a few years ago I was given the table cloth with it and this was the first time it made an appeance. Isn't it beautiful! The fresh hydrangeas from my amazing hubby didn't hurt! ;) 


image.jpg
image.jpg
image.jpg
image.jpg
image.jpg
image.jpg

Spread the Love, Dream Big & Happy Easter!

The Madejs  

Spinach Queso Dip

This dip is the Madej "got-to-dip" for all parties, events and tailgates. With only 4 ingredients plus chips it is super simple & delicious.  You could also use this mixture over pasta, with eggs, on top of tacos, with burgers, etc. so get it while it's HOT!

Ingredients:

  • Velveeta (16oz.)
  • Medium (or Hot) Salsa (16 oz./1 jar)
  • Cream Cheese (8 oz.)
  • Frozen Spinach (10 oz. package)
  • Corn Chips 

Directions:

  1. Find your crock pot. 
  2. Add the Velveeta, salsa, cream cheese & spinach to the crock pot on high heat. 
  3. Stir every 10-15 minutes until fully melted.  Depending on your crock pot this could take anywhere from 30 min-1 hour.  The spinach takes the longest so if you thaw this in advance the melting process will go quicker. 
  4. Serve in your crock pot to stay warm and stir occasionally throughout your party.  
  5. Store extras in your refrigerator and re-heat for leftovers on anything you can add cheese :) 
image.jpg
image.jpg

Spread the Love & Dream Big, 

The Madejs 

The Madejs are Moving......

So as many of you know Josh and I contemplated moving many many places. We took a trip to Portland, ME to see if that was our cup of tea, we went back down to Charlotte, and ran through the list of most other major US cities on the east coast. There were a few major things we were looking for and no city really met all of our wants and needs so we started to re-prioritize and think about what was really important. 

1. Family - we prefer to be in driving distance to everyone. 

2. Job growth - we each have career opportunities that are to great to pass up. 

End result- we are staying in the DC metro area. The Central location hits every box on our check list. We are 4 hours from both of our families in NJ, 2 short hours away from our 3 adorable nieces in Philly, and we will remain living near many close friends and professional networks. Using these networks to our advantage will be critical for success in the next few years.

After the decision to stay in the area settled in we started to think of all the different areas within DC/VA/MD which would be better options than Capitol Hill. We were looking for a larger apartment with similar pricing, a safe neighborhood, something metro accessible, and obviously something dog friendly. Where did we decide to settle you may ask?! OLD TOWN, VA! (Aka... the cutest town ever) 

For those of you who are unfamiliar, Old Town it is down on the Potomac river with lots of shopping, restaurants, brick sidewalks, and tons of restaurant options. Josh and I can't wait to explore the area.  Another huge bonus- we landed ourselves a two bedroom two bathroom apartment for exactly what we pay now! Oh yeah... And there is a pool. Can you say guest room? You are all welcome to visit anytime!  (Photos curtesy of the Google search.. Hopefully I'll have some of my own soon) 

image.jpg
image.jpg
image.jpg

In the beginning we were trying to make a big move in an attempt to go on some crazy adventure. What it took us a while to realize is anywhere we live will be an amazing adventure as long as we are together! 

The move starts tomorrow before the blizzard sets in! We will be unpacking safe in our new apartment watching possibly two feet of snow fall.  

Oh yeah... And because this is my 7th move in the past 9 year I have a few Madej moving tips.

1. Anything you take off the walls - tape the screws or nails to the back so you don't need to find new ones when you go to rehang. 

image.jpg

2. Pack all your folding clothes in garbage bags like this.  

image.jpg

3. PURGE!!! I took 8 garbage bags full of stuff I didn't need to Goodwill.  

4. Leave your dresser packed. Move the drawers, then the body of the dresser and then put the drawers back in :)  

5. Use furniture Dolly's. These things will speed everything up!  

6. Find yourself a good moving partner :) Mine is pretty cute to boot!  


Spread the Love & Dream Big,

The Madejs  

Recipe Box - June Brenner's Maple Syrup Chicken Breasts

In the mood for breakfast for dinner but you don't want pancakes or eggs?  Or maybe your craving something sweet and savory?  This meal seriously reminds me of 1 thing.... childhood with June Brenner as my #1 mom. She would make me this dish every time I asked and now that I have cooked it myself, I'm pretty sure I know why..... it's super easy! And just as good as I remembered!

Ingredients:

  • Chicken Breasts
  • Flour
  • Eggs
  • Butter
  • Syrup (I'm a huge fan of butter syrup but any kind will work). 

Directions:

  1. Heat a skillet at medium heat.
  2. Bread your chicken breasts with flour dipping them in egg first so the coating stays on.
  3. Add a slice of butter to your skillet. Enough to coat the bottom of your pan.
  4. Once the butter is melted sear your chicken until golden brown and cooked all the way through.
  5. Add your syrup - pour it over like your covering your pancakes - and then cover on low heat for about 5 minutes letting it simmer. 
  6. Serve, eat and of course add a dipping station for extra syrup.


Spread the Love & Dream Big, 

Mrs. Madej  

Happy New Year!

To all our blog followers - Happy New Year! We wish you all the best for a happy and healthy 2016.  This New Years Eve we were lucky to celebrate in NJ with amazing company.  The evening was full of an assortment of appetizers, cocktails, 3 dogs, and a late night hot tub party!  Josh and I kissed our wedding year goodbye which was bitter sweet but we were fortunate to stand next to some our best friends, Whitney & Ryan who celebrated ringing their wedding year in!  Kisses all around!  Even one for Arianna ;)

Josh and I have thought a lot about this year and we have good vibes for 2016.  There are so many fun and exciting things in the near future. To start us off we both set some goals and resolutions to try and stick with for the entire year. 

Mrs. Madej - Resolutions and Goals  

  • Concentrating on having better posture.  
  • Be more financially responsible.
  • Spend time on some serious art pieces.  
  • Continue my construction education by taking at least one class or certification program.  
  • Get back in to wedding shape or better by May 2016 and then stay in that shape for the rest of the year (its a life style change!)

Mr. Madej - Resolutions and Goals

  • Finish 20 books - non-fiction of course
  • Be consistently healthy
  • Triple client list for work(....more to come on this)
  • Cook more  

Couple Goals  

  • Do at least one sprint triathlon  
  • Make it the whole year without Cruz having a surgery by being better puppy parents
  • Save for a house down payment
  • Take at least one vacation just the two of us

2016 will be a very exciting year for the Madejs! Here are some things we have to look forward to this year. 

  • Ryan Brenner's College graduation
  • A 9 day catamaran trip through the BVI's over Memorial Day weekend  
  • The watergate hotel will open! (AHH!)
  • Our friends Whitney and Ryan are getting married
  • Our friends Mike and Katelin are getting married this year  
  • Our friends Sarah and Eli are getting married  
  • We will celebrate our 1st married anniversary  
  • Seth Madej is moving back to the USA
  • .........and.......We are moving from Capitol Hill.... Stay tuned to find out where!  
image.jpg
Phone calls with Tory! 

Phone calls with Tory! 

image.jpg
image.jpg
image.jpg
image.jpg
image.jpg

Spread the Love & Dream Big, 

The Madejs

A Merry Madej Christmas - 2016

image.jpg

It was our first Christmas married and it didn't disappoint.  We spent time with both our families and our closest family friends.   Here are some photos and videos from our Christmas weekend. 

Enjoy!

Spread the Love & Dream Big,

The Madejs

The Brenner family taking stockings to a whole new level.  

The Brenner family taking stockings to a whole new level.  

The year Seth and Josh got to join in on the stocking fun. June Brenner even glittered their names on them :)  

The year Seth and Josh got to join in on the stocking fun. June Brenner even glittered their names on them :)  

image.jpg
image.jpg
Post Hartmann Christmas Eve Extavaganza! Puppy love from Cruz!  

Post Hartmann Christmas Eve Extavaganza! Puppy love from Cruz!  

Christmas morning mimosas!  

Christmas morning mimosas!  

Chris Brenner got a new fish from Grandmy!&nbsp;

Chris Brenner got a new fish from Grandmy! 

Our take on a group timer shot. We tried our best :)  

Our take on a group timer shot. We tried our best :)  

Oh hey there dart gun thug.  

Oh hey there dart gun thug.  

.....just a little soiled :)  

.....just a little soiled :)  

Every Brenner special event includes oysters. It is a must have! 

Every Brenner special event includes oysters. It is a must have! 

June Brenner watched YouTube to find out how to fold the napkins like trees. So impressed.  

June Brenner watched YouTube to find out how to fold the napkins like trees. So impressed.  

Next stop.... Madej Family Christmas dinner! Here is a great shot of Josh and his Grandfather.  

Next stop.... Madej Family Christmas dinner! Here is a great shot of Josh and his Grandfather.  

... Insert here (cutest baby ever! little Eliza Anne) 

... Insert here (cutest baby ever! little Eliza Anne) 

We just couldn't get enough! 

We just couldn't get enough! 

image.jpg
image.jpg
image.jpg
Parents night out!  

Parents night out!  

Pop Madej &amp; Eliza

Pop Madej & Eliza

2015 Annual NYC Brenner Drinkmas Bar Crawl

image.jpg

Last weekend was the 2015 annual NYC Brenner Drinkmas Bar Crawl!  Every year my dad, Chris Brenner hunts down an assortment of NYC bars in mid-town for us to crawl around too.  This year was no exception.  He has been perfecting the list for 5 years and as our group size gets bigger so do the bars. 

We started our trip on Friday afternoon with a bus ride from DC to NYC.  Six and a half hours later we arrived at the new, beautiful Cambria Suites Hotel which only opened a few weeks ago. I have to say, the staff was lovely and the hotel was beautiful.  And I'm not just saying that because by Dad built it :)!  We checked in, grabbed some dinner and then walked to see THE TREE (which our BFF, Jen Meador had never seen) and then took a stroll through Bryant Park. It was quite the festive adventure. Anyone else go see the tree this year? We were very impressed with the castle light show on the side of the building on 5th Avenue. 

image.jpg

Saturday morning started out with a great breakfast at the hotel restaurant. If you ever find your way to the Cambria make sure you try the egg white omelet! According to Chris Brenner, "the flavors just keep coming and coming!" After filling our bellies we started the bar crawl with a tall boy of bud light in our hotel room Madej/Meador style and then made stops at New York Beer Company, Beery Authority, District Tap House, Dewey Pub, Holland House, & Ginger Man.  

image.jpg
image.jpg
image.jpg
image.jpg
image.jpg
image.jpg
image.jpg
image.jpg
image.jpg
image.jpg

Spread the Love & Merry Christmas!

The Madejs  

Cranberry & Apricot Jam Baked Brie

This delicious treat is the perfect snack or appetizer to add to your holiday menu. It's melt in your mouth good and super simple but looks difficult and will impress your guests!

image.jpg

Ingredients: 

  • Puff pastry sheets (comes in a 2-pack but you only need 1) 
  • Craisins - 1/2 cup
  • 1 Egg  
  • Apricot Jam - 1 large spoonful
  • Brie Wheel 8oz  
  • Crackers - we like to pair with Cracked Pepper Water Crackers  

Directions: 

  1. Put 1/2 cup of Craisins into water to soak
  2. Take out the puff pastry to thaw - gently unroll so you don't crack it on the fold lines. It took mine about 20 minutes to thaw enough to roll it out.
  3. Preheat your oven to 350 degrees.
  4. Beat 1 egg and set to the side.  
  5. Once the pastry is thawed, sprinkle a little flour on your rolling surface and roll out to smooth all your edges. Mine was about 15" x 15"  
  6. Take a large spoonful of the apricot jam and spoon into the center and then even out in a 4" circle  
  7. Place your Brie wheel right on top of the jam.
  8. Drain the Craisins and place on top of the Brie. 
  9. Brush the four corners of your puff pastry with egg.  
  10. Take the four corners of your puff pastry and gather and the top. Pinch and twist until you have a bonded top. 
  11. Transfer your Brie to a baking sheet which is well oiled. 
  12. Brush the top of the Brie and all over with egg. 
  13. Cook for20-25 minutes.  Watch the top of the puff pastry  to make sure it is not burning on the top.
  14. Let the Brie sit for 5-10 minutes before serving with crackers and a small cheese knife. 

Enjoy!  

image.jpg
image.jpg

Here the craisons are soaking in water which helps let the flavor out.

image.jpg
image.jpg
image.jpg
image.jpg
image.jpg
image.jpg
image.jpg
image.jpg
image.jpg
image.jpg
image.jpg

Spread the Love & Dream Big,

Mrs. Madej

The Madejs Have Been Married for Half a Year!

Can you all believe it? The Madejs tied the knot 6 months ago on Sunday. It fees like the wedding of a lifetime was just yesterday. Being married is wonderful! I'm not sure if it's possible but I would say Josh and I are even more in love today than we were the day of the wedding. Marriage brings this new sense of both partnership and commitment and with those new things comes complete and total happiness.  You now have a partner in crime and know that whatever happens they will be there to help you, love you, and support you. 

Serious future plans are in the works and we are excited to share those with all of our blog followers over the next year. We have a move to look forward to in the next two months, Mr. Madej is transitioning jobs, and if we are really lucky The Watergate Hotel will open! 

Overall we are very happy to report back to everyone - the Madej Marriage is a total success! Winning! And of course we went out to celebrate yesterday which included getting our first married Christmas tree and a brunch date at Senarts Oyster House. *side note - amazing brunch place if you are looking for something more low key with a seafood vibe, a good draft beer selection, and giant bottomless mimosas (juice on the side).

image.jpg
image.jpg
image.jpg
image.jpg
image.jpg
image.jpg

P.S. Friends and Family - Your holiday cards are coming soon!   If you have moved since the wedding or you think we don't have your address please message it to us directly :) 

Spread the Love & Dream Big,

The Madejs 

Spotlight Saturday - Michelle Levin is now a practicing lawyer for The Ruvolo Law Group!

Michelle Photo.jpg

I'm sure everyone is familiar with that warm fuzzy feeling you get when your friend is simply crushing her dream! Well I have that feeling right now for my amazingly talented and smart friend Michelle Levin, Esq. I've had the same feeling for Michelle multiple times over the past few years...when she was accepted into law school, when she CRUSHED the New Jersey and the New York Bar on the first try, when she landed a clerkship with the Honorable Catherine I. Enright, Presiding Judge of the Family Part in Morris County, NJ but most of all when she landed her first job working for a law firm. 

What does this mean exactly? Well, you can officially hire her services as a practicing lawyer! Hopefully I will never be in need of her services of family and matrimonial law, but if looking for a lawyer in this category I wouldn't hire anyone else. Her determined demeanor will always be on your side. I remember a time in the 9th grade when Michelle told my dad she wanted to be a lawyer some day. His response was, typical Chris Brenner belly laughter followed up by "I would never want to go up against Michelle. She's going to be a great lawyer".  He couldn't have been more correct. Michelle is now working with the Ruvolo Law Group, LLC.  For more information on the Ruvolo Group click here. You can also click here to find more information on Michelle on the company website.

image.jpg

Congratulations Michelle!  The Madejs couldn't be luckier to have you in our lives!

Spread the Love & DREAM BIG!

The Madejs